
(You can just download the guide here.)
FORWARD
Andu Mijomee’s creativity in pioneering this mod is outstanding. His skills are extraordinary, and all members of the NIC (Nerf Internet Community) owe him a debt of gratitude for his particular incarnation. However, his video guide was a bit long for those of us just hoping to dive in and build one for ourselves. While his craftsmanship is clearly steps above ours, we have taken steps to follow his guide and translate it in to a written, step-by-step condensed form.
Please note that this guide is not perfect, much like Andu’s. Depending on your own level of skill and knowledge pool, you may find more efficient ways to complete each step on your way to the final product. That’s fine. Our builders are intermediate at best,
and we’re doing what we can to make sure other beginners and journeymen can build Triadstrikes of their own. Before you do, though, realize we omit some sub-steps. This is because we already expect you to:
- Know how to do basic mods on a Triad.
- Know how to do basic mods on a Firestrike.
- Watch – or at least quickly scan – Andu’s original videos, on YouTube or the MyLastDart blog.
Don’t panic if you haven’t looked these things up. Just take a break, and come back later. This guide isn’t going anywhere.
ADDITIONAL NECESSARY SUPPLIES AND MATERIALS
Rotary Tool (Dremel) : Cutting/Grinding Disc and small & large Grinding Cones.
Drill: 7/32 drill bit (or 5/32, depending on confidence) and optional 7/64 drill bit.
Adhesives: Two-part epoxy, Devcon welder, or Gorilla Glue (NOT “normal” super glue). Hot glue gun. Epoxy putty (JB Plastic recommended).
Sandpaper: 120, 220, 400 grits.
Braided PVC Tubing: Andu used 1/2″ toilet lead from ACE hardware, from what we can tell. We used 3/8″ ice machine tubing from Home Depot’s plumbing section.
Razor (hobby) knife.
Screwdrivers (both Phillips and flat-head, relatively small).
Replacement Springs: OrangeModWorks – 7kg or heavier – and Catch springs.
PHASE ONE: The Triad
1. Drill a hole in the very center of the Triad’s back plate with your 7/32 bit. There will be a hidden screw you will need to loosen to remove the AR/barrel assembly. Don’t take the screw out – just loosen it.
2. Remove the four screws holding the plunger assembly in the handle of the Triad. Pull the assembly out and set it aside for later projects and spare parts.
3. See that small slit between the back plate and the rear of the grip? Use a small flat-head screwdriver to pry the plate from the housing there. If you’re lucky, you’ve gotten a triad that isn’t glued together, and the housing should slide right out.
4. Before you set the internal assembly inside, cut about 1/3 off the pegs and smooth the resulting ends down. This will allow for other darts to be utilized. This step is optional, but advised.

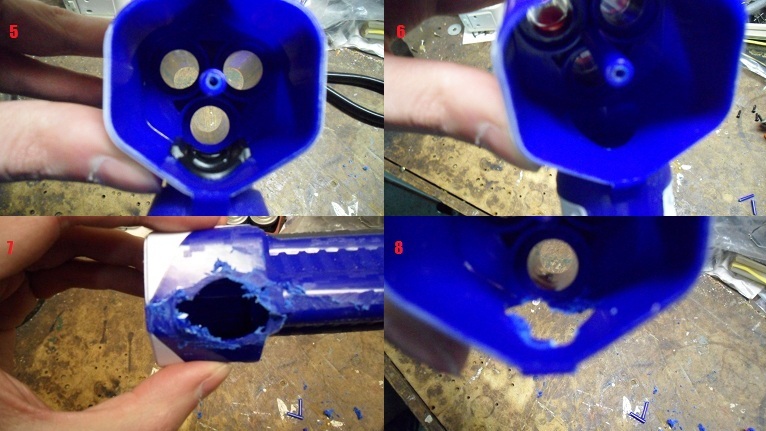
5. See that black rubber in the grip? It can be pulled out, so go ahead and do so. It’s not a necessary part, and will save you some hassle when cutting as the tube will now be clear (Picture 6).
6. Use your cutting/grinding disc to cut the lower part of the Triad from the barrel housing. Melted, rough plastic is inevitable (as you see in Pictures 7 and 8). Shave it away with your razor knife and sand it down if you feel the need. Try not to remove too much of the shell near the barrels. In Picture 8, we cut it a bit close.
You can set the Triad parts aside for now. Let’s move on to prepping the Firestrike.
PHASE TWO: The Firestrike
1. Open up your Firestrike. Notice the area we’ve circled? When you take apart your plunger assembly and pull all of your parts out, make sure it’s mostly intact. You’ll need it later.

2. It’s time to mangle the shell. The line we’ve roughly drawn is based on Andu’s initial line. This is an initial line to cut. You will need to cut and grind a bit lower and farther back depending on how you want your Triad to rest in the shell. “Results may vary.”

3. Once you’ve cut the front off your shell, there will be a screw peg and a support peg that must be removed. We’ve circled them here for you. Cut them off with your disc, then shave off the melted plastic and grind/sand them down.
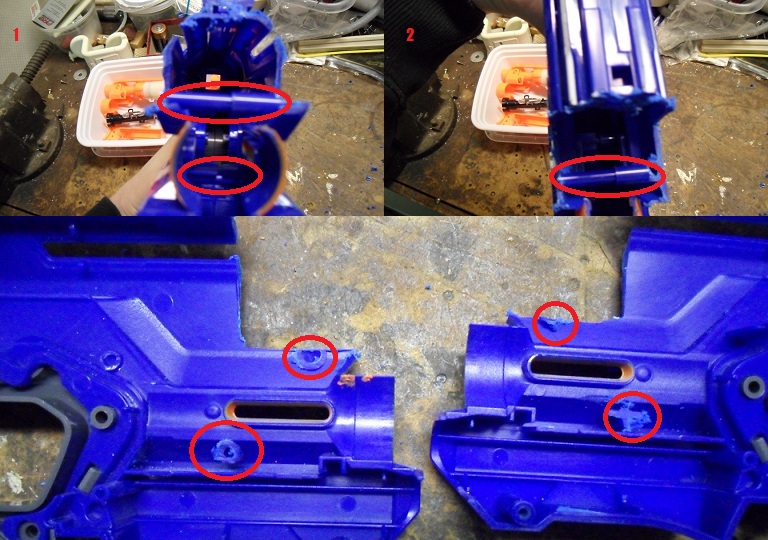
4. See our “final” cuts below? We went back a bit too far to allow us to keep the rail usable, as you can see, but it gives you an idea how far back you will need to go from the initial cuts. Take your time. Patience will be the key here.
5. Take the top “clip” of the plunger assembly, and snip off the pegs on its rear. Glue them in place with a couple dabs of adhesive.

PHASE THREE: The Air Assembly
(NOTE: Epoxy putty takes about 2 hours to dry to a “workable” state, but we recommend the full 24 between steps.)
1. Assuming you’ve gotten the plunger and air restrictor assembly taken apart already, you’re going to need the rear disc of the assembly. Put it back on the front of the plunger tube. For convenience’s sake, try and make the top “peg” of the disc line up vertically with the top slot of the plunger tube. Glue it in place, then fill as much dead space as you feel comfortable doing so with epoxy putty.
2. Using your larger grinding stone, begin to grind out an opening for your air tube. You will need to come in at an angle, grinding both tube and attached disc.

3. Working on the plunger rod can be tricky. With patience, you can apparently remove the white head with a small screwdriver. We could not, after nearly an hour of fiddling with it. So…we cut it. Not the best idea, but what’s done is done. Once your catch and spring are removed from the plunger rod – however you did it – fill the hollow areas with epoxy putty. This will add mass (later compensated for with springs), but will also add durability to your rod.

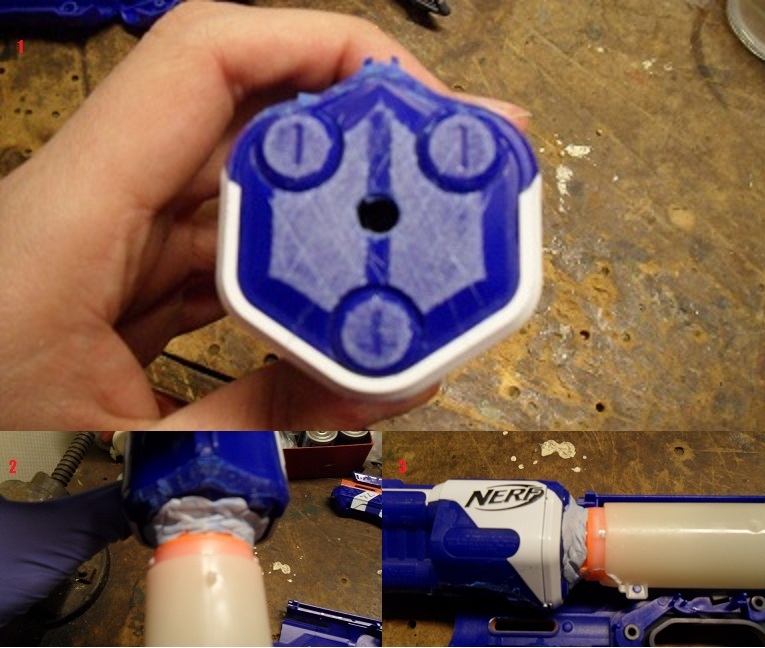
4. Prep the back plate of the Triad to accept putty more easily by not only sanding it, but cutting some crosshatched grooves with your razor knife (Picture 1). Then, create a “bed” of epoxy putty for it to rest on. Merge the end of the tube to the back plate just below the two faux “bolts” on the plate, aiming for dead center. Press the epoxy between the two, making sure it’s going to hold them together (Picture 2).
5. Rest the merged assembly in the blaster to make sure it takes the right form (Picture 3.)
6. Once the putty has dried, prep a “sacrificial dart” with some silicon grease and slide it in to the lower barrel. This will hold the AR back while you glue later, and make sure you don’t accidentally glue the chamber shut.
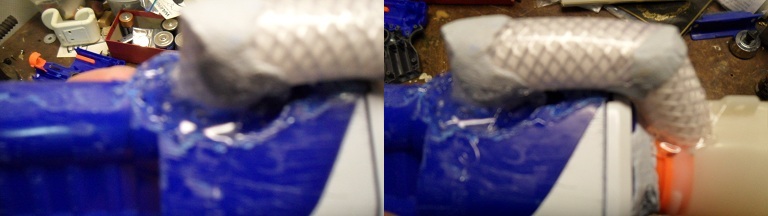
7. It’s time to cut the tubing to bridge the two parts of the assembly. Depending on the angle of your originally ground access hole, your parts will vary. However, you can see how ours had to turn out. Take note of the angling. Try and get it as tight to the bottom of the assembly as you can.
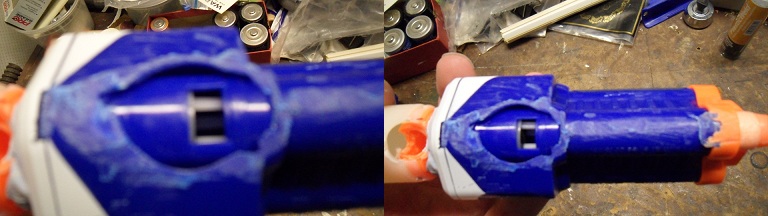
8. Whereas Andu sealed the joints with hot glue and electrical tape, we took a “sturdier” approach by using hot glue, then covering and sealing with putty. As of the second day of use, nearly all joints have cracked open and started leaking. Sturdy is too brittle. Go for the tape.

9. After making sure there are no air leaks in your tubing, nest it on both ends of the assembly with hot glue. Make sure you have good seals, and let it dry.
PHASE FOUR: Assemble!
1. Once all of your adhesives have set and hardened nicely, it’s almost time to rebuild. Before you do, do you remember that piece we told you to keep at the beginning? You’re going to need to cut the lowest, crescent-shaped part of it off, as close to a closed crescent as you can. Then, you’ll be gluing that to the finished assembly (to make sure it doesn’t wobble).

2. Next, put it all back together and make sure it fits well. To get the air flow you’re going to need for the new method of travel, you’ll need to put a heavy spring back on your plunger rod. We used the OrangeModWorks 8kg Swarmfire spring. Andu used the 7kg Firestrike spring. His seemed to come out better.

FINAL THOUGHTS
If things have gone well, you’re now sitting there with a Triadstrike. However, results may vary. While being cosmetically inferior, our “TS” also doesn’t seem to perform nearly as well as Andu’s. Accuracy is much worse, as is the range. We think this may be a result of air flow from the new tube, so make sure you have a large, steady stream of air supplied by a powerful spring system. We’re guessing 8kg is the minimum to see any kind of worthwhile results.
Speaking of, remember when we mentioned cutting the plunger rod was a bad idea? The only way to reassemble it seemed to be to add a little putty to reinforce, but ultimately to screw it back together. That’s why we recommend the 7/64 bit – for a pilot hole. However, this will probably not be a good solution and will eventually wear down the end of your rod. Just a bit of forewarning.
Also, you may be asking yourself “Why didn’t you remove the air restrictors?” Well, you can, but if you do you’ve essentially made a shotgun. You will lose the Triad’s ability to fire one barrel at a time, so you’ll need to make that choice by yourself. You also could put together some little mask for that front crescent above the dart holders, but we like it open. That way, we can easily see if the air tube starts to break down or leak.
We would once again like to thank Andu Mijomee for thinking up such a genius and magnificent mod. We would like to thank Asif Zahoor (MyLastDart) for bringing it to our attention and giving Andu a large public following. Lastly, we would like to thank you for reading this mod guide and attempting the Triadstrike for yourself.


Hi Derps! (Quite a name you’ve got, there.) I love your guide, and your praise is humbling.
I am nearing completion of a new TriadStrike (the MK II)–it will be my definitive version. Using a refined pipe system, it matches or outperforms stock Triads/Firestrikes with the original Firestrike spring.
I’ve also refined some cuts in the shell and custom built a new light for it.
I’m also planning a new, high-powered MK III for a commission.
I’ll be sure to post some videos in a comment here for you to see–do you have a facebook, group email, or any easier way to contact you?
Thanks again for doing such a good job with your write-up–I never did have the time or motivation to make one. Oya!
Hi, Andu! Yeah, at least one of us is on Facebook. We’ve actually conversed on the Modders group page a bit. I’ll fill you in from there. Our “general” contact is derpmodsnerfers@gmail.com, but we’re (I’m) a touch apprehensive still about posting too much contact info here as of yet.
[…] TriadStrike started off our year with a bang, but of course the arrival of the Messenger kind of invalidated it […]
I just discovered and love this design. I would love to attempt my own, but I have to ask if there is something about the triad internals that prevent a direct connection between the rear of the triad SmartAR and the plunger without the bent pipe?
Sorry, SF. I seldom check this one these days – easier to get ahold of me over on Blaster Hub.
Anyway, it’s because the usual plunger orientation is from the bottom, and thus that’s where the “intake” would be for the Triad’s smart AR. Since the Firestrike’s plunger is forward-facing, you kind of have to fenegle it a bit to get everything to line up. Of course, another option is to get a Messenger or one of its reshells, and customize it to your liking.
Hi there, simply changed into alert to your weblog thru Google,
and found that it is truly informative. I’m going to be careful for brussels.
I will appreciate should you continue this in future. Numerous other folks might be benefited from your writing.
Cheers!